This is a work in progress and may be updated in future. Please feel free to comment.
The Bitnami stack for deployment on AWS is beautifully crafted.
- Ubuntu
- Apache2
- WordPress (single instance)
- Other PHP applications
- Apache2
Apache2 configuration
Apache is configured so that there is a default website.
/opt/bitnami/apache2/htdocs
with a configuration file
/opt/bitnami/apache2/conf/httpd.conf
/opt/bitnami/apache2/conf/httpd.conf
Optimisation
Bitnami optimise the number of threads and workers and timeouts for the Apache server by including a softlink whose target is set when the server is built or resized,
Include "/opt/bitnami/apache2/conf/bitnami/httpd.conf"
Applications
To host the actual applications it is necessary to overwrite the configuration that gives us the default website. Bitnami do this by a line near the bottom of the file:
Include "/opt/bitnami/apache2/conf/bitnami/bitnami.conf"
/opt/bitnami/apache2/conf/bitnami/bitnami.conf
This overwrites the default settings of the Apache webserver and loads the appropriate SSL modules (I am not exactly sure what is happening in this file yet.)
At the bottom of this file we have the key line that actually loads the application websites into Apache.
Include "/opt/bitnami/apache2/conf/bitnami/bitnami-apps-vhosts.conf"
You will see that this file is well named “bitnami-apps-vhosts.conf”. In the standard bitnami distribution this includes a single (in this example) WordPress site.
"/opt/bitnami/apps/wordpress/conf/httpd-vhosts.conf"
Because we want to host a WordPress farm we will replace this line with
Include "/opt/bitnami/apps/wordpress-farm.conf"
which has the file ownership and group “bitnami” and the permissions 0644.
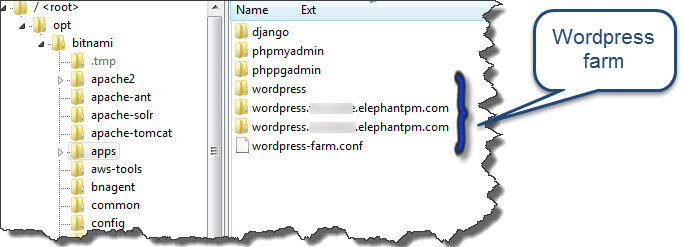
/opt/bitnami/apps/wordpress-farm.conf
This file contains a single entry for each site. The first site listed is the default that comes with the bitnami distribution. The others adopt my own naming convention.
# james bayley
# license MIT
Include "/opt/bitnami/apps/wordpress/conf/httpd-vhosts.conf"
Include "/opt/bitnami/apps/wordpress.client1.elephantpm.com/conf/httpd-vhosts.conf"
Include "/opt/bitnami/apps/wordpress.client2.elephantpm.com/conf/httpd-vhosts.conf"
Individual site configuration
The individual site is configured using two files
httpd-vhosts.conf
<VirtualHost *:80>
 ServerName client1.elephantpm.com
 ServerAlias *.client1.elephantpm.com
 DocumentRoot "/opt/bitnami/apps/wordpress.client1.elephantpm.com/htdocs"
 Include "/opt/bitnami/apps/wordpress.client1.elephantpm.com/conf/httpd-app.conf"
The ServerAlias is used because I am actually using WordPress Multisite. This requires both a server alias and a wildcard entry in the DNS to support user’s individual websites.
If the site is SSL enabled there will be an additional entry like,
<VirtualHost *:443>
 ServerName client1.elephantpm.com
 ServerAlias *.client1.elephantpm.com
 DocumentRoot "/opt/bitnami/apps/wordpress.client1.elephantpm.com/htdocs"
 SSLEngine on
 SSLCertificateFile "/opt/bitnami/apps/wordpress.client1.elephantpm.com/conf/certs/server.crt"
 SSLCertificateKeyFile "/opt/bitnami/apps/wordpress.client1.elephantpm.com/conf/certs/server.key"
 SSLCertificateChainFile "/opt/bitnami/apps/wordpress.client1.elephantpm.com/conf/certs/server-ca.crt"
 Include "/opt/bitnami/apps/wordpress.client1.elephantpm.com/conf/httpd-app.conf"
</VirtualHost>
and you will need to put your certificates in the location shown.
httpd-app.conf
This contains
- Directory level security options
- rewrite rules to support multisite
- PHP_FPM options
Testing the Server Configuration
Remember to restart Apache after each change.
When implementing this configuration put a simple “hello world” page as index.html in your virtual hosts htdocs directory and verify that it is working before trying to get the WordPress application working.
Installing WordPress
When you fire up a bitnami stack you get everything prebuilt for you. For subsequent servers you will have to do it yourself manually (unless you write/find a script for it). The steps are
- Create a database (unless you are going to use the same one with a different table prefix)
- Download a fresh install of WordPress
- Copy the WordPress files into the htdocs directory
- run http://(your sitename here)/wp-admin/install.php
- WordPress is now running
Installing WordPress Multisite
WordPress Multisite cannot be manually installed directly. You must first install WordPress and the upgrade the site by following these instructions.
This process adds additional tables to the database. Failure it exactly may result in infinite loops and other WordPress horrors.
To enable file uploads and the installation of plugins it is necessary to make daemon the owner and group of
/wp-content/uploads/
With the permissions 0755 and to apply those permissions recursively. If you still have problems uploading verify that these permission have been set correctly.
Summary
This post shows how to create a WordPress webfarm but once the flow of control is understood it is easy to include virtual hosts running static websites or other applications.

2 responses to “Creating a WordPress farm on a Bitnami server”
[…] Multisite has been to enable hourly snapshots in the Bitnami EC2 console. Now that I have created a WordPress Multisite farm on my server this is no longer sufficient. The reason is that I need the ability to restore (and […]
[…] have previously posted on how to create a WordPress (Multisite) farm on a Bitnami server. A big problem when you manage a farm is keeping all the plug-ins up-to date. Until the release of […]